App only authentication in SharePoint Online using latest Azure sdk

When using SharePoint Online ideally the method to authenticate and getting access tokens is done using the Azure AD App Only. This method includes using of Azure AD App Registration and self signed certificates. This concept is brilliantly explained on the Microsoft’s blog (Granting access via Azure AD App-Only). I highly recommend reading this article. Once all the configuration is done as per guidance from the blog, there are multiple ways to connect to SharePoint. Our interest is Using the Principal and making use of Azure Key Vaults to store Certificate and retrieve it.

Microsoft’s blog make use of the Nuget packages such as SharePointPnPCoreOnline and Microsoft.Azure.KeyVault which are now deprecated and are not maintained. In my opinion there is no harm in using these for sometime as they are being used in many projects already. But these has limitations, such as SharePointPnPCoreOnline cannot be used in the .NetCore framework.

Microsoft highly recommend using the latest packages which are cross platform. So this obviously made me think to write the code using the latest packages, and since there are no samples easily available, thought to post the research (#SharingisCaring 🙂 ).

Please follow the steps

Generate Self signed Certificate

I would not go deep here. As Granting access via Azure AD App-Only has already explained well on how to generate a certificate. I used the PowerShell script which is shared by Microsoft. And I have made gist here, please refer at Create-SelfSignedCertificate.ps1. On running this script, you will be asked to give a password to encrypt your private key, and both the .PFX file and .CER file will be exported to the current folder. Please save these for future use.

Azure App Registration

Steps are simple, you will need an Azure Active Directory Tenant which is linked to an Office/Microsoft 365 Tenant. You must use an account of a user member of the Tenant Global Admins group.

  • Login to the Azure Portal
  • Go to Azure Active Directory
  • From the Left menu bar, click on “App registrations”
  • From the Blade on right, click on “New registration”
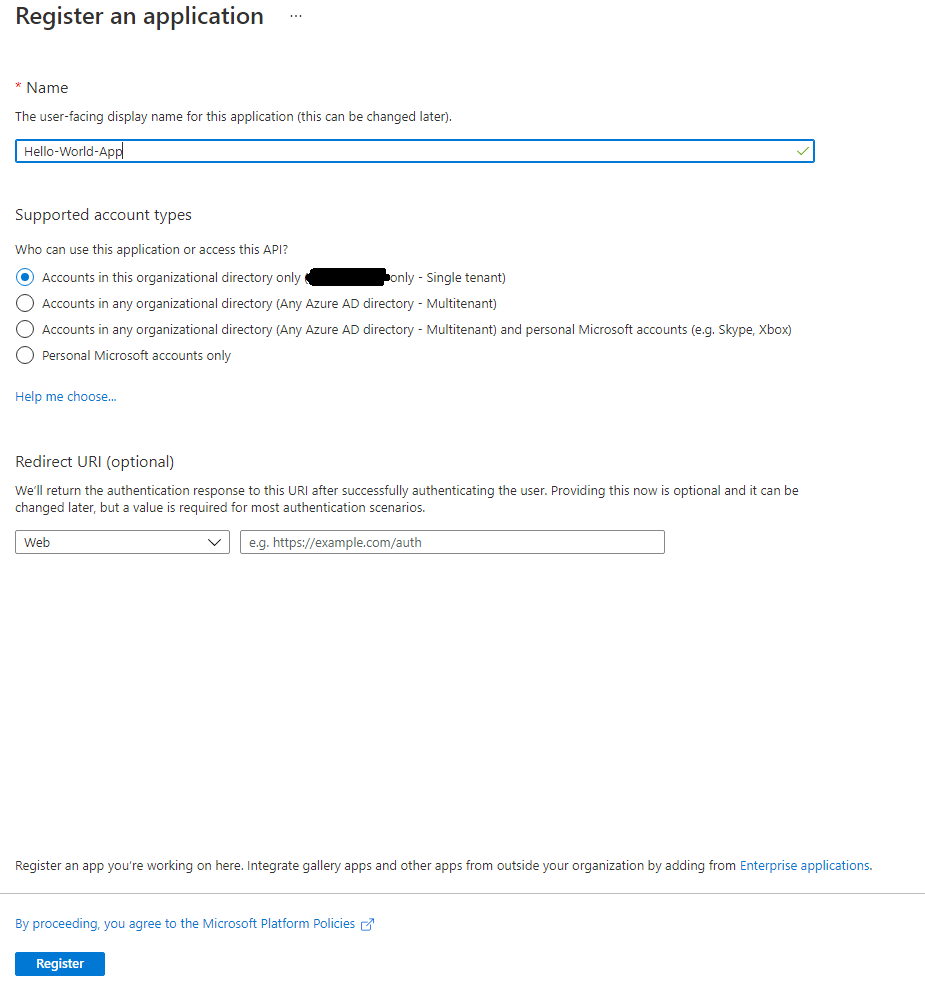
  • Register an Application by giving a meaningful name as follows.
  • From the left menu bar, click on Api permissions. And Grant Full Control or what ever you need on SharePoint.
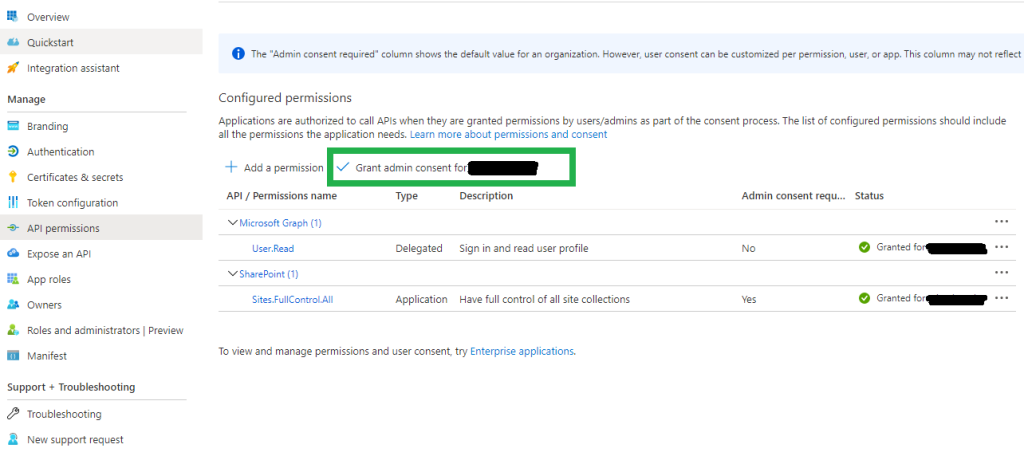
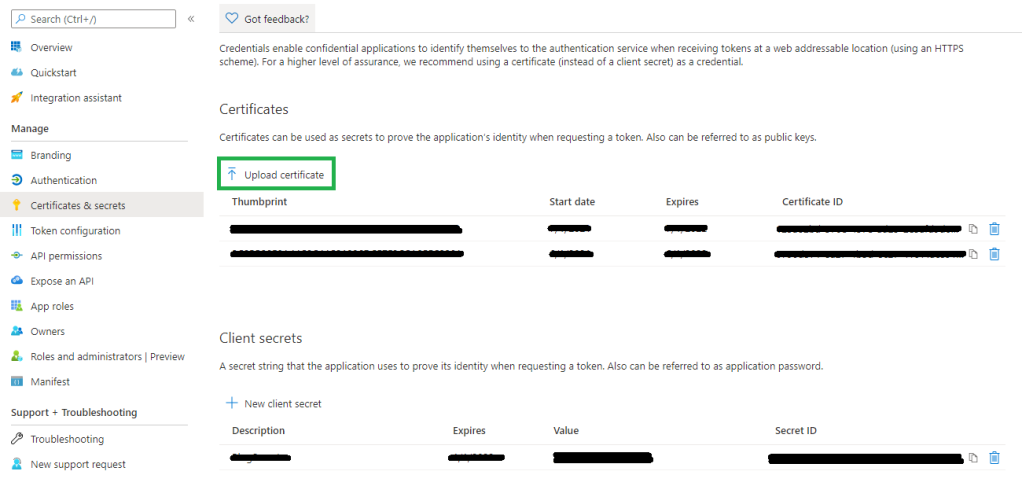
  • Again from left menu bar click on “Certificates & secrets”. And upload the certificate “.CER” file which we created in our first step above. This makes our Azure App registration complete.
Create Azure Function

Either directly create one from the Azure Portal or create it from visual studio. This is a very basic step (I am assuming anyone who will read this blog must have basic knowledge about Azure Functions). So, whatever way you create the function, for now we will keep it as is, and no code change if you have created it from visual studio.

For the sake of an example. We have named our Azure Function as “Hello World Function”.

Create a New or use an existing Azure Key Vault

  • From the Azure Portal, Under Azure services click on “Create a resource”.
  • Search for “Key Vault” in the search services and marketplace search bar.
  • Follow the wizard and your Key Vault is ready to use.

Now, either you are using a newly created or an existing Key Vault we need to do few settings.

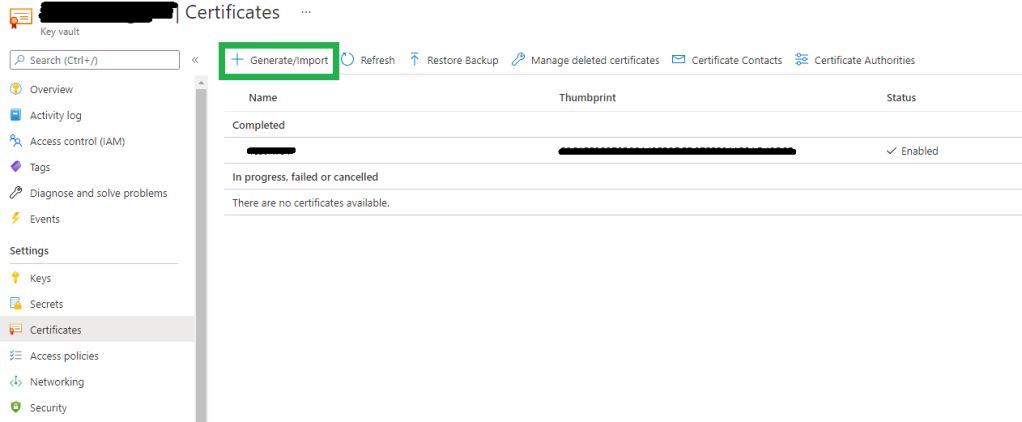
  • Go to the Key Vault, and from left menu bar click on “Certificates”
  • Click on Generate/Import
  • Import the certificate “.PFX” file which we created from the first step above.
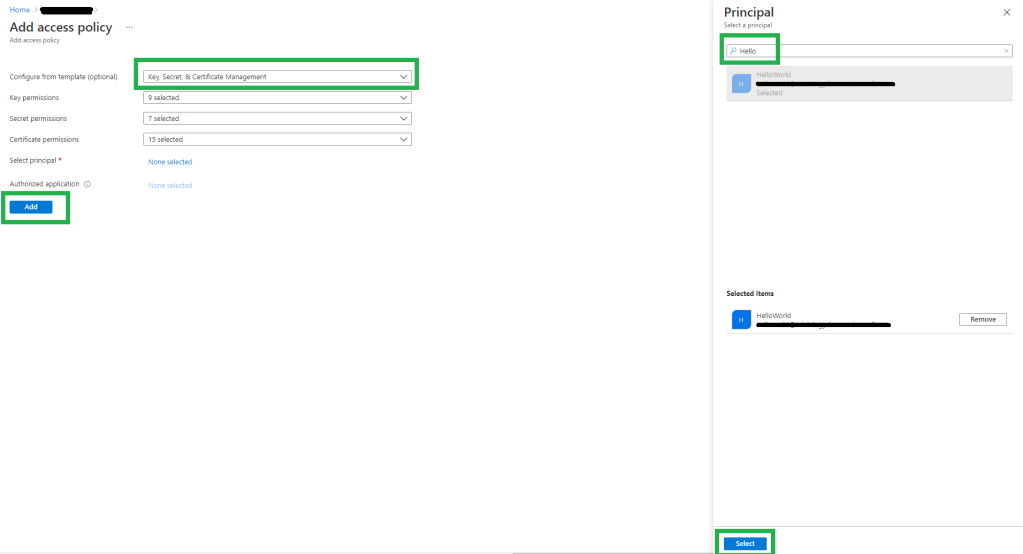
  • After successful upload of certificate, from the Left menu bar click on “Access policies”, and click on “Add Access Policy”.
  • Choose the Key, Secret, & Certificate Management. Click on “None selected” for Select principal. From the blade which opens up at the right, type in “Hello World Function” in the search bar. Notice that the Azure Function which we created will appear in the list. Please choose and click on “Select”.
  • Once the Principal is successfully added and the blade is closed. Notice that the Function is listed as below screen shot. This means that now our Azure Function has permission to access Key Vault secrets.
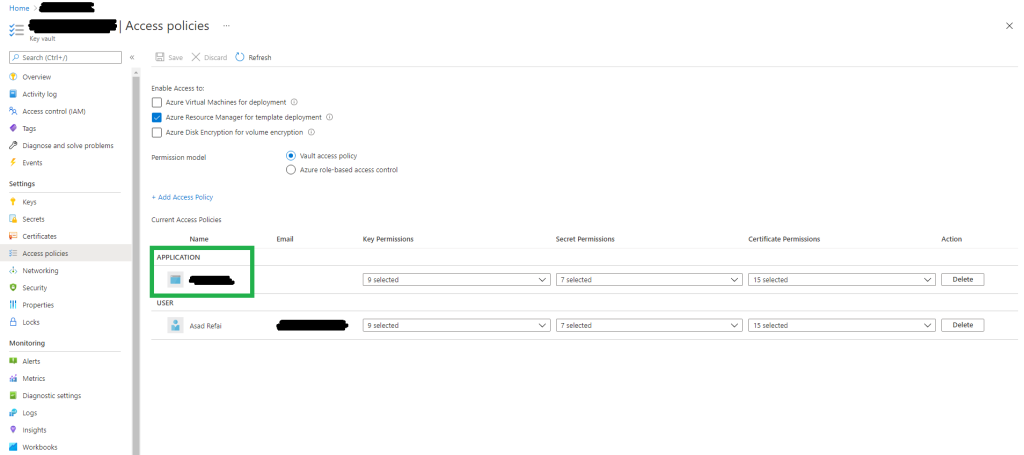
  • This completes configuration of Key Vaults. After this step Azure Function will have permission to access the secrets in Key Vault.

Code samples

  • Install following nuget packages
    • Azure.Identity
    • Azure.Security.KeyVault.Secrets
    • PnP.Framework

I would encourage everyone to read about Azure Identity Client Library and especially how DefaultAzureCredential works. The Azure Identity library provides Azure Active Directory token authentication support.

So, the key things to know for the code are as follows

  1. Secret Name: This would be the name of the certificate you gave while uploading on Key Vault
  2. Key Vault Name: Name of the Key Vault which you created earlier in above step. To construct the URL to access Key Vault
  3. SecretClient: This is a class under “Azure.Security.KeyVault.Secrets”. Its object will be created by passing the Key Vault uri and object of DefaultAzureCredentials(). This is how a connection is established with the Key Vault.
const string secretName = "TestName";
var keyVaultName = "test-blog-kv";
var kvUri = $"https://{keyVaultName}.vault.azure.net";
var client = new SecretClient(new Uri(kvUri), new DefaultAzureCredential());
var secret = await client.GetSecretAsync(secretName);

To understand the above code. It’s important one knows how DefaultAzureCredential() works. It is very seamless whether you working on your development environment (maybe on console application) or Azure Function deployed on Azure.

One might face difficulty in authentication like I did.

Before I transfer my code into Azure Function I was trying things in .NetCore Console App. Every time I used to get an error at the below lines of code.

var client = new SecretClient(new Uri(kvUri), new DefaultAzureCredential());
var secret = await client.GetSecretAsync(secretName); // Threw Exception here, because above line could not establish authenticated connection.

DefaultAzureCredential behind the scene tries to authenticate in series based on Environment Variables, Managed Identity, Visual Studio, Azure CLI, Azure PowerShell etc.

I set up my visual studio 2019 with the Azure account as shown in the link here. Extracts from the link: To authenticate in Visual Studio select the Tools > Options menu to launch the Options dialog. Then navigate to the Azure Service Authentication options to sign in with your Azure Active Directory account.
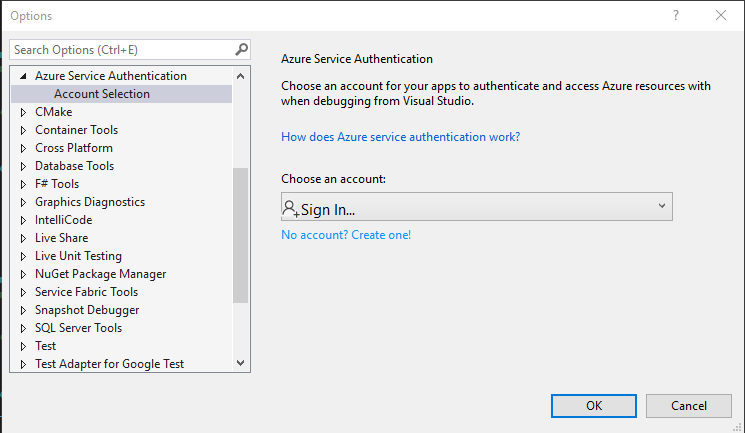
But to my surprise it did not work. I do not know why. I stopped wasting my time on it and thought to read and understand the source code on GitHub. Upon reading the code, one will understand that “DefaultAzureCredential” has an overload method which accepts an object of class “DefaultAzureCredentialOptions”. This object has properties to exclude authentication methods which we do not want to try and keep the ones which we want to try.

So I decided to choose the simplest one i.e. Azure CLI or Azure PowerShell. One must install CLI or PowerShell Azure module on the machine. Then simply run below CLI command.

az login

This will launch browser where you can login with the Azure account. That’s it.

Now going back to the code, I had to add few extra lines so that it run on Console Application.

const string secretName = "Test";
var keyVaultName = "test-blog-kv";
var kvUri = $"https://{keyVaultName}.vault.azure.net";
// Creating an object and excluding methods which I do not want to be executed. Although these are executed in series, i.e. in my code, due to Enviornment Variables or Visual Studio exception was thrown.
// Ideally I would expect, if one method does not work, without breaking code it should move to another one.
DefaultAzureCredentialOptions options = new DefaultAzureCredentialOptions();
options.ExcludeEnvironmentCredential = true;
options.ExcludeInteractiveBrowserCredential = true;
options.ExcludeManagedIdentityCredential = true;
options.ExcludeSharedTokenCacheCredential = true;
options.ExcludeVisualStudioCodeCredential = true;
options.ExcludeVisualStudioCredential = true;
var client = new SecretClient(new Uri(kvUri), new DefaultAzureCredential(options));
var secret = await client.GetSecretAsync(secretName);

Finally I got the value of Certificate from the Key Vault which can then be used in establishing connection with SharePoint.

I did not need to add DefaultAzureCredentialOptions object when I worked on Azure Function and deployed it on Azure.

Full Code for Console App

static async Task Main(string[] args)
{
const string secretName = "Test";
var keyVaultName = "test-blog-kv";
var kvUri = $"https://{keyVaultName}.vault.azure.net";
DefaultAzureCredentialOptions options = new DefaultAzureCredentialOptions();
options.ExcludeEnvironmentCredential = true;
options.ExcludeInteractiveBrowserCredential = true;
options.ExcludeManagedIdentityCredential = true;
options.ExcludeSharedTokenCacheCredential = true;
options.ExcludeVisualStudioCodeCredential = true;
options.ExcludeVisualStudioCredential = true;
var client = new SecretClient(new Uri(kvUri), new DefaultAzureCredential(options));
var secret = await client.GetSecretAsync(secretName);
var cert = new X509Certificate2(Convert.FromBase64String(secret.Value.Value));
var cc = new PnP.Framework.AuthenticationManager("<App Registration Client ID>", cert, "<Tenant ID>", null, PnP.Framework.AzureEnvironment.Production, null).GetContext("https://Tenant.sharepoint.com/&quot;);
cc.Load(cc.Web);
cc.ExecuteQuery();
Console.WriteLine(cc.Web.Title);
}

Full Code for Azure Function (.Net Core Framework)

[FunctionName("Function1")]
public static async Task<IActionResult> Run(
[HttpTrigger(AuthorizationLevel.Function, "get", "post", Route = null)] HttpRequest req,
ILogger log)
{
log.LogInformation("C# HTTP trigger function processed a request.");
const string secretName = "Test";
var keyVaultName = "test-blog-kv";
var kvUri = $"https://{keyVaultName}.vault.azure.net";
var client = new SecretClient(new Uri(kvUri), new DefaultAzureCredential());
var secret = await client.GetSecretAsync(secretName);
var cert = new X509Certificate2(Convert.FromBase64String(secret.Value.Value));
var cc = new PnP.Framework.AuthenticationManager("<Azure App Registration Client ID>", cert, "<Tenant ID>", null, PnP.Framework.AzureEnvironment.Production, null).GetContext("https://Tenant.sharepoint.com&quot;);
cc.Load(cc.Web);
cc.ExecuteQuery();
return new OkObjectResult("Title of web: " + cc.Web.Title);
}

Set default page layout in SharePoint using CSOM

Oh Boy! After a long time I am writing a blog. Currently I am working on an Intranet Portal designed and developed on SharePoint 2013 On-Prem.

We use Office Dev PnP as a deployment strategy code. While deploying one of the Publishing Site, we missed to set the Default Page Layout and it went blank. Which resulted into error while Adding a new page, also the Page Layout and Site Template Settings was throwing error.

On the live environment I didn’t want to run the entire deployment script. So thought of finding some PowerShell code. I came across few blogs, but none of them worked smoothly but crafting out a script from all those references did the job for me.

So thought of posting this code for my reference and others as well. I have written this code in haste. People are free to correct me.

Try{
Add-Type -Path 'C:\Program Files\Common Files\Microsoft Shared\Web Server Extensions\15\ISAPI\Microsoft.SharePoint.Client.dll'
Add-Type -Path 'C:\Program Files\Common Files\Microsoft Shared\Web Server Extensions\15\ISAPI\Microsoft.SharePoint.Client.Runtime.dll'
Add-Type -Path 'C:\Program Files\Common Files\Microsoft Shared\Web Server Extensions\15\ISAPI\Microsoft.SharePoint.Client.Publishing.dll'
}
catch {
Throw "Unable to load SharePoint Client runtime"
}
Function Set-DefaultPageLayout
{
param
(
[string]$url,
[string]$defaultPageLayoutUrl
)
process
{
$Credentials = Get-Credential
#get Client Object
$context = New-Object Microsoft.SharePoint.Client.ClientContext($url)
$context.Credentials = $Credentials
#Load objects
$web = $context.Web
$allProps = $web.AllProperties
$context.Load($web)
$context.Load($context.Site.RootWeb)
$context.Load($allProps)
$context.ExecuteQuery()
Write-Host "Setting available page layouts and default page layout on " $web.Url -NoNewLine
$urlRelative = $context.Site.RootWeb.ServerRelativeUrl + "/" + $defaultPageLayoutUrl
if($context.Site.RootWeb.ServerRelativeUrl -eq "/")
{
$urlRelative = $context.Site.RootWeb.ServerRelativeUrl + $defaultPageLayoutUrl
}
$pageLayoutFile = $context.Site.RootWeb.GetFileByServerRelativeUrl($urlRelative)
$context.Load($pageLayoutFile)
$context.ExecuteQuery();
$listItemFields = $pageLayoutFile.ListItemAllFields
$context.Load($listItemFields)
$context.ExecuteQuery()
$pageGuid = $listItemFields.FieldValues["UniqueId"]
$xmlPageLayout = "<layout guid='{0}' url='{1}' />"
$xmlPageLayout = $xmlPageLayout.Replace("{0}", $pageGuid);
$xmlPageLayout = $xmlPageLayout.Replace("{1}", $defaultPageLayoutUrl);
$allProps["__DefaultPageLayout"] = $defaultPageLayoutXml
$web.Update()
$context.ExecuteQuery()
Write-Host " Done" -ForegroundColor Green
}
}

Large file upload in SharePoint Online with CSOM PowerShell

As a SharePoint developer one comes across many types of projects to work on. One of them is Migration of files from file system to SharePoint Document Libraries. The amount of migration data is always huge like 700GB or may be some TBs.

I am working on a similar project where I need to transfer the file system onto SharePoint Online Libraries. There can be numerous files whose size can be really large (100MB, 500MB or even 1.5GB). This was a big challenge for me.

I follow Microsoft’s OfficeDev Patterns and Practices. They have provided 4 options to upload large files in SharePoint Online. I referred an option which uploads file in slices.

Please refer OfficeDev PnP GitHub sample in detail at

https://github.com/pnp/PnP/tree/master/Samples/Core.LargeFileUpload

PnP’s code is in C#, I have converted same function in PowerShell.

Try{
Add-Type -Path 'C:\Program Files\Common Files\Microsoft Shared\Web Server Extensions\16\ISAPI\Microsoft.SharePoint.Client.dll'
Add-Type -Path 'C:\Program Files\Common Files\Microsoft Shared\Web Server Extensions\16\ISAPI\Microsoft.SharePoint.Client.Runtime.dll'
}
catch {
Write-Host $_.Exception.Message
Write-Host "No further parts of the migration will be completed"
}
Function UploadFileInSlice ($ctx, $libraryName, $fileName, $fileChunkSizeInMB) {
$fileChunkSizeInMB = 9
# Each sliced upload requires a unique ID.
$UploadId = [GUID]::NewGuid()
# Get the name of the file.
$UniqueFileName = [System.IO.Path]::GetFileName($fileName)
# Get the folder to upload into.
$Docs = $ctx.Web.Lists.GetByTitle($libraryName)
$ctx.Load($Docs)
$ctx.Load($Docs.RootFolder)
$ctx.ExecuteQuery()
# Get the information about the folder that will hold the file.
$ServerRelativeUrlOfRootFolder = $Docs.RootFolder.ServerRelativeUrl
# File object.
[Microsoft.SharePoint.Client.File] $upload
# Calculate block size in bytes.
$BlockSize = $fileChunkSizeInMB * 1024 * 1024
# Get the size of the file.
$FileSize = (Get-Item $fileName).length
if ($FileSize -le $BlockSize)
{
# Use regular approach.
$FileStream = New-Object IO.FileStream($fileName,[System.IO.FileMode]::Open)
$FileCreationInfo = New-Object Microsoft.SharePoint.Client.FileCreationInformation
$FileCreationInfo.Overwrite = $true
$FileCreationInfo.ContentStream = $FileStream
$FileCreationInfo.URL = $UniqueFileName
$Upload = $Docs.RootFolder.Files.Add($FileCreationInfo)
$ctx.Load($Upload)
$ctx.ExecuteQuery()
return $Upload
}
else
{
# Use large file upload approach.
$BytesUploaded = $null
$Fs = $null
Try {
$Fs = [System.IO.File]::Open($fileName, [System.IO.FileMode]::Open, [System.IO.FileAccess]::Read, [System.IO.FileShare]::ReadWrite)
$br = New-Object System.IO.BinaryReader($Fs)
$buffer = New-Object System.Byte[]($BlockSize)
$lastBuffer = $null
$fileoffset = 0
$totalBytesRead = 0
$bytesRead
$first = $true
$last = $false
# Read data from file system in blocks.
while(($bytesRead = $br.Read($buffer, 0, $buffer.Length)) -gt 0) {
$totalBytesRead = $totalBytesRead + $bytesRead
# You've reached the end of the file.
if($totalBytesRead -eq $FileSize) {
$last = $true
# Copy to a new buffer that has the correct size.
$lastBuffer = New-Object System.Byte[]($bytesRead)
[array]::Copy($buffer, 0, $lastBuffer, 0, $bytesRead)
}
If($first)
{
$ContentStream = New-Object System.IO.MemoryStream
# Add an empty file.
$fileInfo = New-Object Microsoft.SharePoint.Client.FileCreationInformation
$fileInfo.ContentStream = $ContentStream
$fileInfo.Url = $UniqueFileName
$fileInfo.Overwrite = $true
$Upload = $Docs.RootFolder.Files.Add($fileInfo)
$ctx.Load($Upload)
# Start upload by uploading the first slice.
$s = [System.IO.MemoryStream]::new($buffer)
# Call the start upload method on the first slice.
$BytesUploaded = $Upload.StartUpload($UploadId, $s)
$ctx.ExecuteQuery()
# fileoffset is the pointer where the next slice will be added.
$fileoffset = $BytesUploaded.Value
# You can only start the upload once.
$first = $false
}
Else
{
# Get a reference to your file.
$Upload = $ctx.Web.GetFileByServerRelativeUrl($Docs.RootFolder.ServerRelativeUrl + [System.IO.Path]::AltDirectorySeparatorChar + $UniqueFileName);
If($last) {
# Is this the last slice of data?
$s = [System.IO.MemoryStream]::new($lastBuffer)
# End sliced upload by calling FinishUpload.
$Upload = $Upload.FinishUpload($UploadId, $fileoffset, $s)
$ctx.ExecuteQuery()
Write-Host "File upload complete"
# Return the file object for the uploaded file.
return $Upload
}
else {
$s = [System.IO.MemoryStream]::new($buffer)
# Continue sliced upload.
$BytesUploaded = $Upload.ContinueUpload($UploadId, $fileoffset, $s)
$ctx.ExecuteQuery()
# Update fileoffset for the next slice.
$fileoffset = $BytesUploaded.Value
}
}
} #// while ((bytesRead = br.Read(buffer, 0, buffer.Length)) > 0)
}
Catch {
Write-Host $_.Exception.Message -ForegroundColor Red
}
Finally {
if ($Fs -ne $null)
{
$Fs.Dispose()
}
}
}
return $null
}

Usage

$credentials = Get-Credential
$SiteURL = "https://yoursite.sharepoint.com"
$Context = New-Object Microsoft.SharePoint.Client.ClientContext($SiteURL)
$Context.Credentials = New-Object Microsoft.SharePoint.Client.SharePointOnlineCredentials($credentials.UserName, $credentials.Password)

$UpFile = UploadFileInSlice -ctx $Context -libraryName "YourLibName" -fileName "C:\LargeFiles\FileWithLargeSize.docx"

Change page layout of a SharePoint publishing page using CSOM PowerShell

If you are in a situation where you have already created a page and want to change the Page layout to another one, Also if you want the default welcome page of your Publishing Site to have a new branded page layout then I guess this function is helpful.

function ChangePageLayout()
{
param(
[Parameter(Mandatory=$true)][string]$siteurl,
[Parameter(Mandatory=$false)][System.Net.NetworkCredential]$credentials,
[Parameter(Mandatory=$false)][string]$PageName,
[Parameter(Mandatory=$false)][string]$PageLayoutName,
[Parameter(Mandatory=$false)][string]$PageLayoutDisplayName,
[Parameter(Mandatory=$false)][string]$Title,
[Parameter(Mandatory=$false)][bool]$isCustomPageLayout
)
try
{
$ctx = New-Object Microsoft.SharePoint.Client.ClientContext($siteurl)
$ctx.Credentials = $credentials
if($isCustomPageLayout -eq $false)
{
$PageLayoutName = "/_catalogs/masterpage/" + $PageLayoutName + "," + $PageLayoutDisplayName
}
else
{
#Here I have assumed that if its custom page layout, then it's placed inside some folder which is child to masterpage
#If that's not the case with you then you can use below line of code
#$PageLayoutName = "/_catalogs/masterpage/" + $PageLayoutName + ", " + $PageLayoutDisplayName
#
$PageLayoutName = "/_catalogs/masterpage/Custom Page Layouts/" + $PageLayoutName + ", " + $PageLayoutDisplayName
}
$Pages = $ctx.Web.Lists.GetByTitle('Pages')
$camlQuery = New-Object Microsoft.SharePoint.Client.CamlQuery
$camlQuery.ViewXml = '<View><Query><Where><Eq><FieldRef Name="FileLeafRef" /><Value Type="Text">'+ $PageName +'</Value></Eq></Where></Query></View>'
$Page = $Pages.GetItems($camlQuery)
$ctx.Load($Page)
$ctx.ExecuteQuery()
$file = $Page.File
$ctx.Load($file)
$ctx.ExecuteQuery()
if ($file.CheckOutType -ne [Microsoft.SharePoint.Client.CheckOutType]::None) {
$file.UndoCheckOut()
$ctx.Load($file)
$ctx.ExecuteQuery()
}
$file.CheckOut()
$ctx.Load($file)
$ctx.ExecuteQuery()
$Page.Set_Item("PublishingPageLayout", $PageLayoutName)
$Page.Set_Item("Title", $Title)
$Page.Update()
$Page.File.CheckIn("", [Microsoft.SharePoint.Client.CheckinType]::MajorCheckIn)
$Page.File.Publish("")
#check for approval
$ctx.Load($Pages)
$ctx.ExecuteQuery()
if ($Pages.EnableModeration -eq $true) {
$Page.File.Approve("")
}
$ctx.Load($Page)
$ctx.ExecuteQuery()
Write-Host "Update Page Layout Complete"
Write-Host ""
}
catch
{
Write-Host ("Error while changing page layout. Error -->> " + $_.Exception.Message) -ForegroundColor Red
}
}

Usage:

$credentials = Get-Credential
ChangePageLayout "http:yoursite.com" $credentials "default.aspx" "YourCustomLayout.aspx" "Your Custom Page Layout" "Some Title" $true

SharePoint 2013 Office365 find source of a record in record centre using Document ID service

Yet again a QUEST is solved. How can we know the Source of a record in a library in Record Centre? I must admit that I was not the only one to solve it, my colleague and senior Nikhil Patel has huge contribution into it.

Platform: Office 365 (But I believe this should work in SharePoint 2013 on premise as well)

Scenario: There are more than 50 site collections and Record Centre is one of them. From the Site collections we are dumping documents as records in Record Centre. And in the view of a library in Record Centre we would like to know the source of the record(i.e. from which site collection it has come from).

Approach:

To understand the approach let us assume a normal site collection and a record centre site collection. And From a normal site collection we will be sending documents to record centre site collection.

  • Things to do at Site collection: First we need to activate the Document ID service feature. Goto site settings > Site Collection Features > Activate Document ID Service
  • Update Document ID settings: We can set the prefix of the Document ID generated for each site collection to maintain uniqueness. Goto Site Settings > Site Collection Administration > Document ID Settings

Document ID settings

Performing above steps when ever a document is uploaded it will have a unique Document Id. Refer below screen shot.

Record Library

If we try to break the Id N3SITE-424387581-13 we can notice that

1. N3SITE: is the prefix which we have in Document ID settings.
2. 424387581: Is the random number generated by SharePoint.
3. 13: is nothing but the normal ID of a document.

N3SITE and 13 are quite easy to understand and they are in our control to identify which site collection. But 424387581 puzzle us, and also from site collection which library it belongs we would also like to know that.

424387581 is nothing but the unique Id given to a document library. but from where we got to know it?

Cracking down curious case of 424387581: Open your office 365 site collection in SharePoint Designer. From ribbon control click on Site Options which is a property bag. Find the property docid_msft_hier_listidx, this contains the unique id for all the document libraries.

Note: The entry is placed only when a document is uploaded in a Document Library and not before that.

Property Bag

	<?xml version="1.0" encoding="utf-16"?>
	<DictionarySerializer>
	<dictionary>
		<item>
		<key>424387581</key>
		<webGuid>d4317398-252a-4ae2-9f09-90012f992554</webGuid>
		<listGuid>775632c2-489b-4cf6-876c-5947a38170c5</listGuid>
		</item>
	</dictionary>
	</DictionarySerializer>

This solves our problem of identifying the Document Source.

On Record Centre: On a view of a record library which contains records having Document ID, we can place a link which will open a new window passing Document ID in query string.

and on that window we can write our own logic first to break down the Document ID to get the prefix and identify which Site Collection is it. And second query that site collection’s property bag using JSOM and check 424387581 belongs to which document library.

Create Content Organizer Rule using Client Object Model CSOM

Well it took a bit of a time to figure out how I can create content organizer rule with CSOM as I dint wanna create some 100 manually on Office 365. But finally the QUEST is complete now and I have a wonderful csom c# and Powershell code to do the job.

What’s the trick: If we navigate to Content Organizer Rules from site settings, We can notice that its nothing but a list and all the Rules are stored as list items. Thankfully we have CSOM library available which allows us to save a list item using either c# or PowerShell. So the trick is to create ‘Rules’ as an item.

What to know: Now as we know that we create Rules as an item, But the big question remains what to store and which field/columns to set so that a proper well functioned Rule can be created.

Think Out of Box: Create a Content Organizer Rule through SharePoint UI. Now since its a list we can query it and get the values of all the fields. This is how we know SharePoint use which field/column and how are the values are stored, for example how SharePoint stores the condition.

Solution:—————–

First thing first: Get the value of a Rule which is added via SharePoint UI so that we get an idea which fields to store in and what type of values it needs.

CSOM c# code to get the Item:

using System;
using System.Collections.Generic;
using System.Linq;
using System.Security;
using System.Text;
using System.Threading.Tasks;
using Microsoft.SharePoint.Client;
namespace RecordCentreRule
{
class Program
{
static void Main(string[] args)
{
var targetSite = new Uri("https://YourSite.sharepoint.com&quot;);
var login = "SomeOne@SharePoint.onmicrosoft.com";
var password = "YourPassword";
var securePassword = new SecureString();
foreach (char c in password)
{
securePassword.AppendChar(c);
}
var onlineCredentials = new SharePointOnlineCredentials(login, securePassword);
using (ClientContext clientCtx = new ClientContext(targetSite))
{
clientCtx.Credentials = onlineCredentials;
Web web = clientCtx.Web;
List routingRulesList = web.Lists.GetByTitle("Content Organizer Rules");
ListItem itm = routingRulesList.GetItemById(1);
clientCtx.Load(web);
clientCtx.Load(routingRulesList);
clientCtx.Load(itm);
clientCtx.ExecuteQuery();
Console.WriteLine("Title: " + itm["Title"] + "\n");
Console.WriteLine("RoutingConditions: " + itm["RoutingConditions"] + "\n");
Console.WriteLine("RoutingConditionProperties: " + itm["RoutingConditionProperties"] + "\n");
Console.WriteLine("RoutingContentType: " + itm["RoutingContentType"] + "\n");
Console.WriteLine("RoutingContentTypeInternal: " + itm["RoutingContentTypeInternal"] + "\n");
Console.WriteLine("RoutingConditions: " + itm["RoutingConditions"] + "\n");
Console.WriteLine("RoutingConditionProperties: " + itm["RoutingConditionProperties"] + "\n");
Console.WriteLine("RoutingAliases: " + itm["RoutingAliases"] + "\n");
Console.WriteLine("RoutingTargetLibrary: " + itm["RoutingTargetLibrary"] + "\n");
Console.WriteLine("RoutingTargetFolder: " + itm["RoutingTargetFolder"] + "\n");
Console.WriteLine("RoutingTargetPath: " + itm["RoutingTargetPath"] + "\n");
Console.WriteLine("RoutingAutoFolderProp: " + itm["RoutingAutoFolderProp"] + "\n");
Console.WriteLine("RoutingAutoFolderSettings: " + itm["RoutingAutoFolderSettings"] + "\n");
Console.WriteLine("RoutingCustomRouter: " + itm["RoutingCustomRouter"] + "\n");
Console.WriteLine("RoutingRuleExternal: " + itm["RoutingRuleExternal"] + "\n");
Console.Read();
}
}
}
}

CSOM PowerShell Code:

# replace these details (also consider using Get-Credential to enter password securely as script runs)..
$username = "SomeOne@SharePoint.onmicrosoft.com"
$password = "YourPassword"
$url = "https://YourSite.sharepoint.com&quot;
$securePassword = ConvertTo-SecureString $Password -AsPlainText -Force
# the path here may need to change if you used e.g. C:\Lib..
Add-Type -Path "c:\Program Files\Common Files\microsoft shared\Web Server Extensions\15\ISAPI\Microsoft.SharePoint.Client.dll"
Add-Type -Path "c:\Program Files\Common Files\microsoft shared\Web Server Extensions\15\ISAPI\Microsoft.SharePoint.Client.Runtime.dll"
# connect/authenticate to SharePoint Online and get ClientContext object..
$clientContext = New-Object Microsoft.SharePoint.Client.ClientContext($url)
$credentials = New-Object Microsoft.SharePoint.Client.SharePointOnlineCredentials($username, $securePassword)
$clientContext.Credentials = $credentials
if (!$clientContext.ServerObjectIsNull.Value)
{
Write-Host "Connected to SharePoint Online site: '$Url'" -ForegroundColor Green
$web = $clientContext.Site.RootWeb
$listRoutingRules = $web.Lists.GetByTitle("Content Organizer Rules")
$item = $listRoutingRules.GetItemById(1)
$clientContext.Load($listRoutingRules)
$clientContext.Load($item)
$clientContext.ExecuteQuery()
Write-Host "Title: " $item["Title"]
Write-Host "RoutingConditions: " $item["RoutingConditions"]
Write-Host "RoutingConditionProperties: " $item["RoutingConditionProperties"]
Write-Host "RoutingContentType: " $item["RoutingContentType"]
Write-Host "RoutingContentTypeInternal: " $item["RoutingContentTypeInternal"]
Write-Host "RoutingConditions: " $item["RoutingConditions"]
Write-Host "RoutingConditionProperties: " $item["RoutingConditionProperties"]
Write-Host "RoutingAliases: " $item["RoutingAliases"]
Write-Host "RoutingTargetLibrary: " $item["RoutingTargetLibrary"]
Write-Host "RoutingTargetFolder: " $item["RoutingTargetFolder"]
Write-Host "RoutingTargetPath: " $item["RoutingTargetPath"]
Write-Host "RoutingAutoFolderProp: " $item["RoutingAutoFolderProp"]
Write-Host "RoutingAutoFolderSettings: " $item["RoutingAutoFolderSettings"]
Write-Host "RoutingCustomRouter: " $item["RoutingCustomRouter"]
Write-Host "RoutingRuleExternal: " $item["RoutingRuleExternal"]
}

So this is how we know what and How values are stored in a Rule.

Second Step would be just create a new item (Rule) with our values as inspired by above results.

CSOM c# code to create a Rule:

using System;
using System.Collections.Generic;
using System.Linq;
using System.Security;
using System.Text;
using System.Threading.Tasks;
using Microsoft.SharePoint.Client;
namespace RecordCentreRule
{
class Program
{
static void Main(string[] args)
{
var targetSite = new Uri("https://YourSite.sharepoint.com&quot;);
var login = "SomeOne@SharePoint.onmicrosoft.com";
var password = "YourPassword";
var securePassword = new SecureString();
foreach (char c in password)
{
securePassword.AppendChar(c);
}
var onlineCredentials = new SharePointOnlineCredentials(login, securePassword);
using (ClientContext clientCtx = new ClientContext(targetSite))
{
clientCtx.Credentials = onlineCredentials;
Web web = clientCtx.Web;
List routingRulesList = web.Lists.GetByTitle("Content Organizer Rules");
clientCtx.Load(routingRulesList);
clientCtx.ExecuteQuery();
ListItemCreationInformation routingRuleInfo = new ListItemCreationInformation();
ListItem routingRule = routingRulesList.AddItem(routingRuleInfo);
routingRule["Title"] = "From Console";
routingRule["RoutingRuleName"] = "From Console";
routingRule["RoutingRuleDescription"] = "From Console";
routingRule["RoutingPriority"] = 1;
routingRule["RoutingEnabled"] = true;
routingRule["RoutingContentType"] = "Your Content Type Name";
routingRule["RoutingContentTypeInternal"] = "0x000000000000000000000000000000000000000000000000000000|Your Content Type Name";
routingRule["RoutingConditions"] = "<Conditions><Condition Column=\"xxxx-xxx-xxx-xxx-xxxxx|Column|Column Name\" Operator=\"EqualsOrIsAChildOf\" Value=\"1;#WhatEver|xxxx-xxx-xxx-xxx-xxxx\" /></Conditions>";
routingRule["RoutingConditionProperties"] = "Column Name on which you need condition";
routingRule["RoutingAliases"] = "Your Content Type Name";
routingRule["RoutingTargetLibrary"] = "Target Library";
routingRule["RoutingTargetFolder"] = "";
routingRule["RoutingTargetPath"] = "/sites/YourSite/Target Library";
routingRule["RoutingAutoFolderProp"] = "Folder Property";
routingRule["RoutingAutoFolderSettings"] = "<AutoFolder><Properties><Property Name=\"AutoFolderEnabled\" Value=\"True\" /><Property Name=\"AutoFolderPropertyName\" Value=\"Folder Property\" /><Property Name=\"AutoFolderPropertyInternalName\" Value=\"WhatEver\" /><Property Name=\"AutoFolderPropertyID\" Value=\"xxxx-xxxx-xxx-xxx-xxxx\" /><Property Name=\"AutoFolderPropertyFormat\" Value=\"%1 - %2\" /><Property Name=\"AutoFolderPropertyTypeAsString\" Value=\"TaxonomyFieldType\" /><Property Name=\"AutoFolderPropertyTermStore\" Value=\"xxxx-xxx-xxx-xxx-xxxxx\" /></Properties></AutoFolder>";
routingRule["RoutingCustomRouter"] = "";
routingRule["RoutingRuleExternal"] = false;
routingRule.Update();
clientCtx.ExecuteQuery();
Console.WriteLine("Rule created successfully");
Console.Read();
}
}
}
}

CSOM PowerShell to create Rule:

# replace these details (also consider using Get-Credential to enter password securely as script runs)..
$username = "SomeOne@SharePoint.onmicrosoft.com"
$password = "YourPassword"
$url = "https://YourSite.sharepoint.com&quot;
$securePassword = ConvertTo-SecureString $Password -AsPlainText -Force
# the path here may need to change if you used e.g. C:\Lib..
Add-Type -Path "c:\Program Files\Common Files\microsoft shared\Web Server Extensions\15\ISAPI\Microsoft.SharePoint.Client.dll"
Add-Type -Path "c:\Program Files\Common Files\microsoft shared\Web Server Extensions\15\ISAPI\Microsoft.SharePoint.Client.Runtime.dll"
# connect/authenticate to SharePoint Online and get ClientContext object..
$clientContext = New-Object Microsoft.SharePoint.Client.ClientContext($url)
$credentials = New-Object Microsoft.SharePoint.Client.SharePointOnlineCredentials($username, $securePassword)
$clientContext.Credentials = $credentials
if (!$clientContext.ServerObjectIsNull.Value)
{
Write-Host "Connected to SharePoint Online site: '$Url'" -ForegroundColor Green
$web = $clientContext.Site.RootWeb
$listRoutingRules = $web.Lists.GetByTitle("Content Organizer Rules")#RoutingRules
$clientContext.Load($listRoutingRules)
$clientContext.ExecuteQuery()
#Add an item to the list
$ListItemInfo = New-Object Microsoft.SharePoint.Client.ListItemCreationInformation
$Item1 = $listRoutingRules.AddItem($ListItemInfo)
$Item1["Title"] = "Asad Test Rule"
$Item1["RoutingRuleName"] = "Asad Test Rule"
$Item1["RoutingRuleDescription"] = "Asad Test Rule"
$Item1["RoutingPriority"] = 1
$Item1["RoutingEnabled"] = $true
$Item1["RoutingContentType"] = "Your Content Type Name"
$Item1["RoutingContentTypeInternal"] = "0x000000000000000000000000000000000000000000000000000000|Your Content Type Name"
$Item1["RoutingConditions"] = '<Conditions><Condition Column="xxxx-xxx-xxx-xxx-xxxxxx|ColumnName|Column Name" Operator="EqualsOrIsAChildOf" Value="1;#Value|xxxx-xxx-xxx-xxx-xxxxxx" /></Conditions>'
$Item1["RoutingConditionProperties"] = "Condition Property"
$Item1["RoutingAliases"] = "Alias Name"
$Item1["RoutingTargetLibrary"] = "Target Library"
$Item1["RoutingTargetFolder"] = ""
$Item1["RoutingTargetPath"] = "/sites/YourSite/Target Library"
$Item1["RoutingAutoFolderProp"] = "Folder Property"
$Item1["RoutingAutoFolderSettings"] = '<AutoFolder><Properties><Property Name="AutoFolderEnabled" Value="True" /><Property Name="AutoFolderPropertyName" Value="Your Value" /><Property Name="AutoFolderPropertyInternalName" Value="YourValue" /><Property Name="AutoFolderPropertyID" Value="xxxx-xxx-xxx-xx-xxxxx" /><Property Name="AutoFolderPropertyFormat" Value="%1 - %2" /><Property Name="AutoFolderPropertyTypeAsString" Value="TaxonomyFieldType" /><Property Name="AutoFolderPropertyTermStore" Value="xxxx-xxx-xxx-xxx-xxxxxx" /></Properties></AutoFolder>'
$Item1["RoutingCustomRouter"] = ""
$Item1["RoutingRuleExternal"] = $false
$Item1.Update()
$clientContext.ExecuteQuery()
Write-Host "Rule created successfully" -ForegroundColor Green
}

This is how we create rules using CSOM.

Set unique permissions to a SharePoint Group in SharePoint list using CSOM PowerShell

A SharePoint list when created inherits site’s permission, but as we move ahead in project and realise to maintain some unique permissions on the list, then below PowerShell function which uses client object model can be very helpful

For example:

There is a List called SUGGESTIONS and you would want even users from VISITORS group to contribute in it, then with the help of this function we can give contributors role to the users from VISITORS group.

function Set-PermissionsOnList()
{
param(
[Parameter(Mandatory=$true)][string]$url,
[Parameter(Mandatory=$true)][System.Net.NetworkCredential]$credentials,
[Parameter(Mandatory=$true)][string]$listName,
[Parameter(Mandatory=$true)][string]$GroupName,
[Parameter(Mandatory=$true)][string]$Roletype
)
begin{
try
{
#get Client Object
$context = New-Object Microsoft.SharePoint.Client.ClientContext($url)
$context.Credentials = $credentials
$web = $context.Web
$context.Load($web)
$context.ExecuteQuery()
# get root web
$RootWeb = $context.Site.RootWeb
$context.Load($RootWeb)
$context.ExecuteQuery()
# get list
#$lists = $web.Lists
#$context.Load($lists)
#$context.ExecuteQuery()
#$list = $lists | where {$_.Title -eq $listName}
#Retrieve List
$List = $context.Web.Lists.GetByTitle($listName)
$context.Load($List)
$context.ExecuteQuery()
$list.BreakRoleInheritance($true, $false)
$roleType = [Microsoft.SharePoint.Client.RoleType]$Roletype
# get group/principal
$groups = $web.SiteGroups
$context.Load($groups)
$context.ExecuteQuery()
$group = $groups | where {$_.Title -eq $RootWeb.Title + " " + $GroupName}
# get role definition
$roleDefs = $web.RoleDefinitions
$context.Load($roleDefs)
$context.ExecuteQuery()
$roleDef = $roleDefs | where {$_.RoleTypeKind -eq $Roletype}
}
catch
{
Write-Host "Error while getting context. Error -->> " + $_.Exception.Message -ForegroundColor Red
}
}
process{
try
{
# Assign permissions
$collRdb = new-object Microsoft.SharePoint.Client.RoleDefinitionBindingCollection($context)
$collRdb.Add($roleDef)
$collRoleAssign = $list.RoleAssignments
$rollAssign = $collRoleAssign.Add($group, $collRdb)
$context.ExecuteQuery()
Write-Host "Permissions assigned successfully." -ForegroundColor Green
}
catch
{
Write-Host "Error while setting permissions. Error -->> " + $_.Exception.Message -ForegroundColor Red
}
}
end{
$context.Dispose()
}
}

The above function can be called this way

$credentials = Get-Credential
$ListTitle = "Your List Name"
Set-PermissionsOnList "http://YourSite" $credentials $ListTitle "Visitors" "Contributor"

Customize SharePoint 2013 suite bar

The unbranded SharePoint 2013 site contains a SuiteBar which again contains a branding text on top left corner and number of links on top right corner.
Once we start branding our site we would like to get rid of the branding text, and may be add one more link on top right corner.

Customizing Branding Text using jQuery:

OOB branding text looks something like below screen shot.

UnBarndedSuiteBar

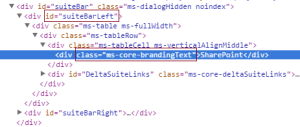
And if we study the source of it using developer tool we can see an html structure like below screen shot.

SourceOfUnbrandedSuiteBar

So to change the branding text below jQuery code can work wonders.

If we just need a simple text change then

jQuery('div#suiteBarLeft .ms-core-brandingText').text("Hello World");

Or if we need to add some html then

jQuery('div#suiteBarLeft .ms-core-brandingText').html("<span>Hello World</span> <img src='your img path'>");

The result of above JavaScript code will be

CustomizedSuitBar

Customizing SuiteBar Links:

OOB branded site has 3 links as shown in below screen shot.

UnBrandedSuiteBarLinks

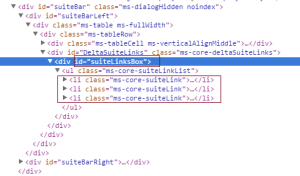
The html source of these links looks something like below.

SourceOfUnBrandedSuiteBarLinks

So to add one more link below code can be helpful.

var customLi = "<li class='ms-core-suiteLink'><a class='ms-core-suiteLink-a' target='_blank' href='www.yourlink.com'>Your Custom Link</a></li>";
if(jQuery("div#suiteLinksBox").children("ul").length > 0){
      	jQuery("div#suiteLinksBox").children("ul").append(customLi);
     	
}
else {
      	jQuery("div#suiteLinksBox").html('<ul class="ms-core-suiteLinkList">' + customLi + '</ul>')
}

The result of above code will be

CustomizedSuiteBarLink

Send email in SharePoint 2013 using JavaScript

Following is the function which can used to send an email in SharePoint 2013 using JavaScript

function sendEmail(from, to, body, subject) {
    //Get the relative url of the site
    var siteurl = _spPageContextInfo.webServerRelativeUrl;
    var urlTemplate = siteurl + "/_api/SP.Utilities.Utility.SendEmail";
    $.ajax({
        contentType: 'application/json',
        url: urlTemplate,
        type: "POST",
        data: JSON.stringify({
            'properties': {
                '__metadata': {
                    'type': 'SP.Utilities.EmailProperties'
                },
                'From': from,
                'To': {
                    'results': [to]
                },
                'Body': body,
                'Subject': subject
            }
        }),
        headers: {
            "Accept": "application/json;odata=verbose",
            "content-type": "application/json;odata=verbose",
            "X-RequestDigest": jQuery("#__REQUESTDIGEST").val()
        },
        success: function(data) {
            alert('Email Sent Successfully');
        },
        error: function(err) {
            alert('Error in sending Email: ' + JSON.stringify(err));
        }
    });
}

Reorder content types in SharePoint list csom PowerShell

A SharePoint list can be associated to more than one content types, often there are situations where we would want to change the order they appear in new button. Content type which appears at first position will become the default content type for the list.

We can achieve this reordering of content types with the help of this small and simple csom powershell function

#Load SharePoint client assemblies
#
Try{
    Add-Type -Path 'C:\Program Files\Common Files\Microsoft Shared\Web Server Extensions\15\ISAPI\Microsoft.SharePoint.Client.dll'
    Add-Type -Path 'C:\Program Files\Common Files\Microsoft Shared\Web Server Extensions\15\ISAPI\Microsoft.SharePoint.Client.Runtime.dll'
    Add-Type -Path 'C:\Program Files\Common Files\Microsoft Shared\Web Server Extensions\15\ISAPI\Microsoft.SharePoint.Client.Publishing.dll'
    Add-Type -Path 'C:\Program Files\Common Files\Microsoft Shared\Web Server Extensions\15\ISAPI\Microsoft.SharePoint.Client.Taxonomy.dll'
}

catch {
	Throw "Unable to load SharePoint Client runtime"
}


function Reorder-ContentTypesInList()
{
    param(
        [Parameter(Mandatory=$true)][string]$url,
        [Parameter(Mandatory=$true)][System.Net.NetworkCredential]$credentials,
        [Parameter(Mandatory=$true)][string]$listName,
        [Parameter(Mandatory=$true)][string[]]$ContentTypeNamesInOrder
    )
    
    begin{
        try
        {
            #get Client Object
			#
            $context = New-Object Microsoft.SharePoint.Client.ClientContext($url)
            $context.Credentials = $credentials

            #Retrieve List
			#
            $list = $context.Web.Lists.GetByTitle($listName)
            $context.Load($list)
            $context.ExecuteQuery()


            #Get Content Types from a list
			#
            $contentTypes = $list.ContentTypes
            $context.Load($contentTypes)
            $context.ExecuteQuery()
        }
        catch{
            Write-Host "Error while getting context. Error -->> "  + $_.Exception.Message -ForegroundColor Red
        }
    }
    process{
        try
        {
            
            #Making generic list of content type ids in passed order
			#
            $ctList = New-Object System.Collections.Generic.List[Microsoft.SharePoint.Client.ContentTypeId]
            Foreach($ct in $ContentTypeNamesInOrder){
                $ctToInclude = $contentTypes | Where {$_.Name -eq $ct}
                $ctList.Add($ctToInclude.Id)
            }


            #Updating content type order
			#
            $list.RootFolder.UniqueContentTypeOrder = $ctList
            $list.Update()
            $context.Load($list)
            $context.ExecuteQuery()
            
            Write-Host "Content Types Reordered successfully" -ForegroundColor Green

        }
        catch
        {
            Write-Host ("Error while reordering content types in a list. Error -->> " + $_.Exception.Message) -ForegroundColor Red
        }
    }
    end{
        $context.Dispose()
    }
}

$credentials = Get-Credential 
$ContentTypesInOrder = "Content Type 1", "Content Type 2", "Content Type 3"
Reorder-ContentTypesInList 'http://YourSite' $credentials 'Your List Name' $ContentTypesInOrder